How to Install a Home EV Charger
EVCI.tech · Cape Town · Installation Guide
How to Install a
Home EV Charger
A step-by-step guide to what’s involved in a safe, code-compliant home wallbox installation in South Africa — from first call to first charge.
Step one
Call a Qualified, Licensed Electrician
Not all electricians understand EV charger installations. Ask specifically for one with EV charging experience, or contact EVCI directly — we work with vetted, registered electricians across the Cape Town area.
- Registered with the Department of Labour — verify their registration number before booking.
- Can issue a Certificate of Compliance (CoC) — legally required for any new electrical circuit in SA.
- Experienced with EV charger wiring — not all residential electricians are familiar with wallbox requirements.
- Avoid unregistered “sparks” — your insurer may reject a claim if a CoC is missing or fraudulent.
Step two
Electrician Site Assessment & DB Board Check
Before any cable is run, the electrician assesses your Distribution Board (DB board) to confirm it can safely carry the additional load of an EV charger. This is the most critical step — many older South African homes have limited spare capacity.
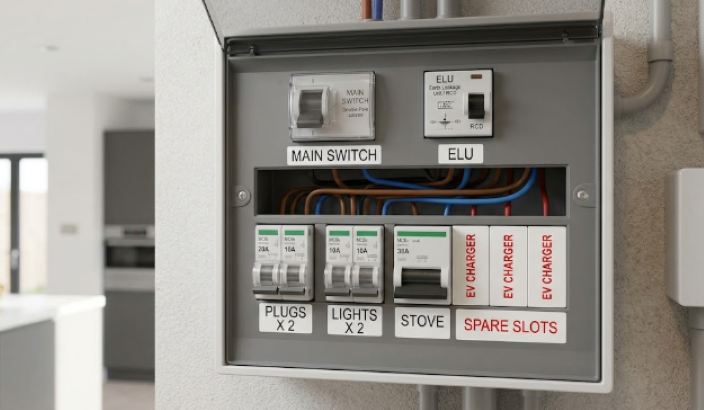
Typical DB Board Layout
DB board must have at least one spare slot for the new dedicated EV breaker.
Load Calculation Example
| Circuit | Load | Notes |
|---|---|---|
| Geyser | 12 A | Typically 3 kW element |
| Stove / Hob | 12 A | Electric stove or induction hob |
| Lights, plugs & other | 10 A | General household load |
| Existing total load | 34 A | Before EV charger |
| EV Charger (7 kW) | + 40 A | Dedicated 40 A breaker required |
| ⚠ Total required | 74 A | Exceeds 60 A incomer by 14 A deficit |
| ✓ Solution | Upgrade incomer to 80 A (contact your municipality or Eskom) — or install a load management / smart circuit to limit EV draw when other loads are high. | |
DB Board Photo
Step three
Run the Cable — Correct Size & Protection
A dedicated cable runs from your DB board to the charger location — typically in your garage or on an outside wall. Cable size depends on the distance, and it must be protected throughout its run.
Use when: Distance from DB board to charger is under 25 metres.
Handles up to 7 kW (32–40 A) at this distance without excessive voltage drop.
Use when: Distance from DB board to charger is over 25 metres.
Larger cross-section reduces resistance and keeps voltage drop within SANS limits.
Always required for any surface-run cable. Bosal 25 mm PVC conduit protects against physical damage, UV, and moisture — use throughout the exposed run.
- Cable must be 3-core (Live, Neutral, Earth) — single phase.
- Run conduit where cable is surface-mounted (walls, ceiling, outside).
- Where cable passes through walls, sleeve with conduit and seal the entry point.
- Keep cable runs neat, secured at regular intervals (every 300–400 mm on surface).
- Never run undersized cable — it will heat up under EV load and is a fire risk.
Step four
Earthing — The Safety Foundation
Proper earthing is non-negotiable for EV charger installations. A fault in the charger or vehicle without a solid earth could be fatal. There are two accepted methods — both are valid, one is preferred for exposed surface runs.
Double earth = double safety
Two independent earth paths mean a fault current can always find a safe return path — even if one connection degrades over time.
OEM requirement
Most charger manufacturers (Wallbox, ABB, Zappi, etc.) specify a supplementary earth in their installation manuals. Honour this or the warranty may be void.
Earth, don’t skip it
An EV delivers high continuous current. Poor earthing + a fault = trip hazard or fire. The earth wire is not optional.
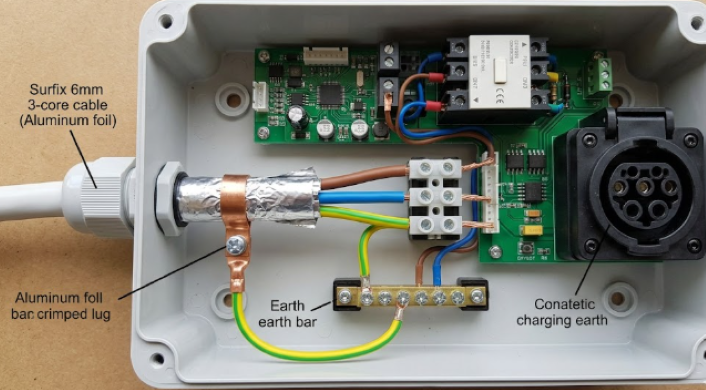
Surfix Cable & Earthing Photo
Step five
Install a Type A Earth Leakage (RCD)
A standard Type AC earth leakage (the one in most SA homes) is not sufficient for EV charger circuits. EV chargers can produce smooth DC fault currents that Type AC breakers cannot detect. The solution is a Type A RCD.
Type AC RCD ✗
Standard in most SA homes. Cannot detect DC fault currents produced by EV charger electronics. Not suitable for EV circuits.
Type A RCD ✓
Detects both AC and pulsed DC fault currents. Specified by virtually all wallbox manufacturers. Required for SANS 10142 compliance on EV circuits.
- Specify a Type A 30mA RCD — 30 milliamps is the sensitivity standard for personal protection.
- Installed at the DB board on the dedicated EV circuit breaker, or as a combined RCBO.
- Some premium wallboxes (e.g. Wallbox Pulsar Plus) have a built-in Type A RCD — confirm with your charger’s installation manual before adding a second one.
- Do not substitute a Type AC — it will likely nuisance-trip or worse, fail to trip on a real fault.
Step six
Test, Commission & Set Up
With wiring complete, the electrician tests the full installation before the charger is powered up. Once electrical tests pass, the charger is commissioned — connected to your Wi-Fi, configured for your vehicle, and set up for smart charging if applicable.
- Earth continuity test — verify low-resistance path from charger back to DB earth bar.
- Insulation resistance test — confirm cable insulation integrity at 500 V DC.
- RCD trip test — the Type A earth leakage is tested to confirm it trips within 300 ms.
- Polarity check — live and neutral confirmed correct at charger terminals.
- Live functional test — charger powered up, vehicle connected, charging confirmed.
App & Wi-Fi Setup
Most smart chargers (Wallbox, EO, Zappi) connect to your home Wi-Fi. Download the manufacturer’s app to set charging schedules, monitor energy use, and control remotely.
Charging Schedule
Set overnight charging to run during Eskom off-peak hours (typically 22:00–06:00) to reduce electricity costs and grid load.
Certificate of Compliance
Your electrician issues a CoC covering the new EV circuit. Keep this document — you’ll need it for insurance and if you ever sell the property.
Current Limit Setting
If your incomer is tight, most chargers allow you to cap the maximum draw (e.g. limit to 24 A / 5.5 kW instead of full 32 A / 7.4 kW).